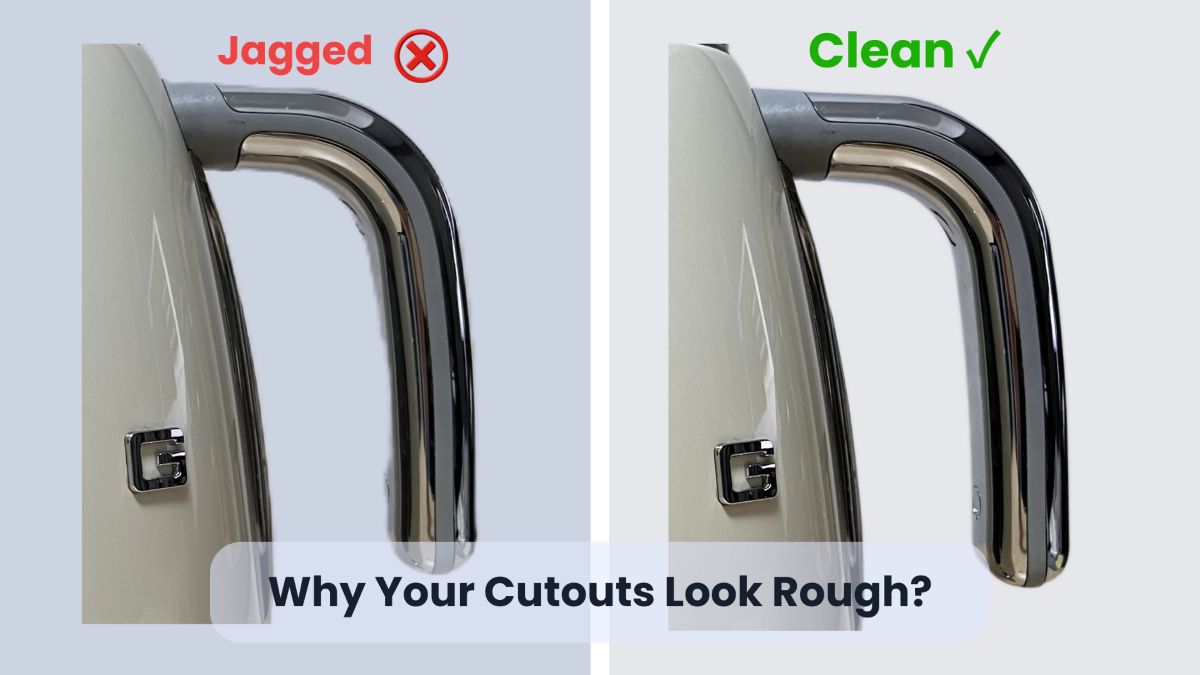
Why Your Cutouts Look Jagged (And How to Fix Rough Edges Fast)
What You'll Learn
✅ Why cutouts have jagged edges, halos, or missing details
✅ The 3 root causes: input problems, tool limits, export traps
✅ Fast fixes ordered by effort (easiest first)
✅ Special handling for hair, fur, and transparent objects
Introduction
You've just run your image through a background remover, downloaded the result, and... the edges look terrible. Jagged outlines. White halos around the subject. Hair strands that look like they were cut with scissors.
This isn't random. There are specific, fixable reasons why cutouts look rough — and once you understand them, you can avoid these problems entirely.
Symptoms You're Seeing
Before diving into fixes, let's identify what you're dealing with:
| Symptom | What It Looks Like | Common Cause |
|---|---|---|
| Jagged edges | Stair-step pattern along curves | Low resolution input or downscaling |
| White/black halo | Thin outline around subject | Background color bleeding into edges |
| Missing hair strands | Chunks of hair cut off | AI struggled with fine details |
| Fuzzy edges | Blurry, undefined boundaries | JPEG compression artifacts |
| Color fringing | Purple/green tint at edges | Chromatic issues in source photo |
Root Cause Matrix
Edge problems fall into three categories. Understanding which category your problem falls into determines the fix.
1. Input Problems (Before Processing)
The quality of your output can never exceed the quality of your input.
| Problem | Why It Happens | How to Detect |
|---|---|---|
| Low resolution | Source image too small | Check dimensions (under 1000px is risky) |
| Motion blur | Camera shake or subject movement | Zoom to 100% and look for blur |
| Heavy JPEG compression | Saved at low quality multiple times | Blocky artifacts, especially in flat areas |
| Poor lighting | Subject blends with background | Low contrast at edges |
The rule: If your source image has problems, no tool can fully fix them. Start with the best source you have.
2. Tool Limits (During Processing)
Every background removal tool has constraints that can affect output quality.
| Limit | What Happens | Example |
|---|---|---|
| Resolution caps | Image downscaled before processing | Canva downscales images over 10MP to 10MP |
| File size limits | Large files rejected or compressed | Some tools limit to 9MB input |
| AI model limits | Struggles with certain subjects | Fine hair, transparent glass, similar colors |
Canva's Specific Limits
According to Canva's documentation, images over 10 megapixels are automatically downscaled to 10MP after background removal. This can introduce jagged edges on high-resolution photos.
SimplyPNG limits for reference:
- Input: Up to 4096px on longest side, 30MB file size (paid tiers)
- Output: Up to 4096px (paid) or 1024px (free/guest)
- Formats: JPEG, PNG, WebP, HEIC/HEIF
3. Export Traps (After Processing)
Even with perfect processing, you can ruin edges at the export stage.
| Trap | What Goes Wrong | Fix |
|---|---|---|
| Exporting as JPEG | JPEG doesn't support transparency | Export as PNG for transparent backgrounds |
| Low JPEG quality | Compression creates artifacts at edges | Use quality 85+ if JPEG is required |
| Re-saving multiple times | Each save degrades quality (JPEG) | Work with PNG, convert to JPEG only at final step |
| Wrong color space | Colors shift, affecting edge blending | Use sRGB for web |
The JPEG Transparency Trap
JPEG files cannot store transparency. If you export a cutout as JPEG, your background removal tool will fill the transparent areas with a solid color (usually white) — and the edges often show a visible halo where the blending occurred.
Fix Playbook (Fastest Wins First)
Here's your troubleshooting order. Start with #1 and work down until the problem is solved.
Fix 1: Export as PNG (Not JPEG)
Time: 5 seconds
Fixes: White halos, loss of transparency, edge artifacts
PNG uses lossless compression, meaning no data is lost when the image is saved. According to Adobe's format comparison, "PNG files benefit from lossless compression... the quality stays the same no matter how many times you edit and save the file."
JPEG, in contrast, uses lossy compression that permanently deletes data — especially problematic around sharp edges where backgrounds meet subjects.
Action: When downloading your cutout, choose PNG format. Only convert to JPEG at the very end if file size is critical.
Fix 2: Use a Higher-Resolution Source
Time: 1-5 minutes
Fixes: Jagged edges, stair-stepping, loss of fine detail
Low-resolution images don't have enough pixels to create smooth curves. When the AI removes the background, those jagged pixel boundaries become visible.
Action:
- Check your source image dimensions
- If under 1500px on longest side, find or create a larger version
- Re-process with the higher-resolution source
Fix 3: Avoid Pre-Compressed JPEGs
Time: Varies
Fixes: Fuzzy edges, blocky artifacts
If your source image was saved as a low-quality JPEG, the compression artifacts are baked in. Background removal can't fix what isn't there.
Action:
- Look for the original photo (RAW, HEIC from phone, or high-quality export)
- If unavailable, the current image may be the best you can get
- Avoid re-saving JPEGs multiple times — each save loses more data
Fix 4: Check for Tool-Specific Downscaling
Time: 2 minutes
Fixes: Unexpected quality loss on high-res images
Some tools silently downscale your image before processing.
Action:
- Compare output dimensions to input dimensions
- If output is smaller, your image was downscaled
- Try a tool that supports your full resolution
Fix 5: Use the Edge QA Checklist
Time: 2 minutes per image
Fixes: Catches problems before final use
Before using any cutout in production:
## Edge QA Checklist
- [ ] Zoom to 100% and inspect edges- [ ] Check for white/black halos- [ ] Verify hair/fur strands are intact- [ ] Confirm file format is PNG (if transparency needed)- [ ] Test on both light and dark backgrounds
Special Cases
Some subjects are harder to cut out than others. Here's how to handle them.
Hair and Fur
Hair is the #1 challenge for background removal. Individual strands are often:
- Partially transparent (you can see through them)
- Similar in color to backgrounds
- Too fine for some AI models to detect
Best practices:
- Start with high contrast: Photos where hair contrasts with the background work best
- Use maximum resolution: Every pixel matters for fine details
- Accept imperfection: Some flyaway hairs may be lost — that's often acceptable
- Manual touch-up: For critical work, use an image editor to refine edges
Transparent Objects (Glass, Plastic, Water)
Transparent and semi-transparent objects are tricky because the AI must decide what's "subject" vs "background" when you can see through both.
Best practices:
- Shoot on solid backgrounds: A clean, single-color background helps the AI distinguish edges
- Expect partial transparency: Some tools preserve semi-transparency better than others
- Test before committing: Process one sample image before batch processing
Subjects Similar to Background
When your subject and background are similar colors (white shirt on white wall), the AI may struggle to find the boundary.
Best practices:
- Increase contrast at source: Reshoot with a contrasting backdrop if possible
- Accept edge blending: Some color bleed may occur where colors are too similar
- Manual refinement: These cases often need hand-editing for perfect results
"Do This Every Time" Mini Checklist
Keep this workflow for consistent results:
- Start with the best source — highest resolution, least compression
- Check tool limits — know what resolution/size your tool supports
- Export as PNG — for any cutout needing transparency
- Inspect at 100% — catch edge problems before use
- Test on multiple backgrounds — halos often only show on certain colors
Conclusion
Jagged edges aren't random — they come from three sources:
- Input problems — low resolution, blur, compression
- Tool limits — downscaling, file size caps, AI constraints
- Export traps — JPEG transparency loss, quality settings
The fastest fixes are often the simplest: export as PNG instead of JPEG, use a higher-resolution source, and inspect edges at 100% before final use.
For challenging subjects like hair, fur, and transparent objects, start with high-contrast source photos and accept that some manual refinement may be needed for critical work.
FAQ
Frequently Asked Questions
Related Articles:
- Cheapest Way to Get Transparent PNGs Without Canva Pro
- Bulk Background Removal for E-Commerce: Amazon & Shopify White Backgrounds
- PNG vs JPEG vs WebP: Export Presets for Cutouts
Last Updated: February 4, 2026
Author: SimplyPNG
Tags: #troubleshooting #image-quality #background-removal #hair-cutout
Sources:
- Canva — Background Remover Help — Official Canva help article
- Adobe — JPEG vs PNG — Adobe Creative Cloud
- MDN — Image file type and format guide — Mozilla Developer Network
- Adobe Photoshop Elements — Anti-aliasing — Adobe Help
Ready to remove backgrounds?
Try SimplyPNG's AI-powered background removal tool for free. No signup required!